Robot vacuums rely on spinning brushes to lift dirt, hair, and debris from your floors. Over time, those same brushes can collect the hair, fibers, and dust they’re picking up, which is a normal part of owning a robot vacuum, not a sign that something is broken. This guide walks through why brush cleaning matters, what parts are typically involved, and what general, safe habits beginners should know, regardless of which brand or model you own.
Learning how to clean robot vacuum brushes can make routine maintenance feel less confusing, especially if this is your first robot vacuum.
This article is meant as a general, beginner-friendly overview. Because designs vary by brand and model, your device’s own manual is the most reliable source for exact steps.
Why Robot Vacuum Brushes Need Cleaning
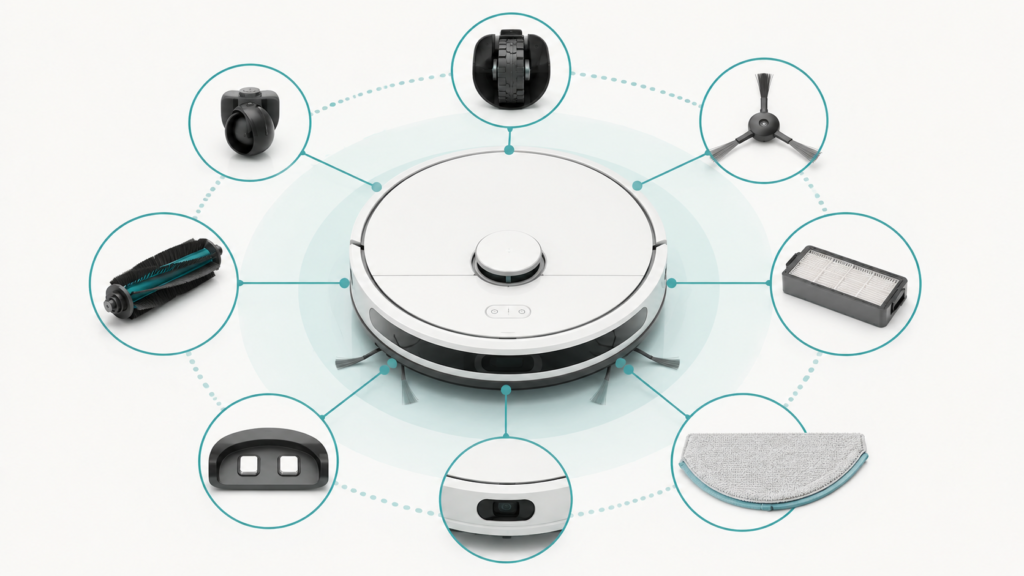
Robot vacuum brushes, both the main (or roller) brush and the smaller side brushes, can collect hair, fibers, dust, and other debris during normal use. This happens because the brushes are doing their job: sweeping debris off the floor and feeding it toward the dustbin. Over time, that debris can wrap around the bristles or build up at the ends of the brush.
Most manufacturers treat brush cleaning as a routine maintenance task, similar to emptying the dustbin or wiping down sensors, rather than a sign of a defect. A robot vacuum that needs its brushes cleaned isn’t malfunctioning, it’s simply due for some basic upkeep.
Main Brush vs. Side Brush: What’s the Difference?
Many robot vacuums use two different types of brushes, and they often need different cleaning approaches because they’re built differently.
Main Brush / Roller Brush
The main brush, sometimes called a roller brush, typically runs along the bottom of the vacuum and spins to lift debris from the floor as the unit moves. Because it spans the width of the vacuum and contacts the floor directly, it’s often the brush that collects the most hair and fibers.
Side Brushes
Side brushes are usually smaller, angled brushes mounted near the edges of the vacuum’s underside. Their general role is to help sweep debris from corners and edges toward the main brush or intake path. Side brushes can also collect tangled hair, though often in smaller amounts than the main brush.
The exact shape, size, and number of brushes can vary quite a bit between models, so it’s normal if your vacuum’s setup looks a little different from these general descriptions.
Signs Your Robot Vacuum Brushes May Need Cleaning
A few common signs can suggest it’s time to check your brushes:
- Visible hair or fibers wrapped around the main brush or side brushes
- The vacuum sounds like it’s working harder than usual or makes a different noise
- Debris seems to get left behind in areas it used to pick up cleanly
- A brush appears to spin more slowly, unevenly, or not at all
Many manufacturers recommend checking brushes for tangled hair or debris on a roughly weekly basis, and more often in homes with pets, though this is a general guideline rather than a strict schedule that applies to every model. Checking periodically, even briefly, can help you catch buildup before it becomes harder to remove.
How to Clean Robot Vacuum Brushes Safely
The general process below reflects common steps described across multiple manufacturers’ guidance. The exact mechanism for removing and reinstalling brushes, tabs, screws, covers, or slots, varies by brand and model, so check your manual for the specific steps for your unit.
Step 1: Turn the Robot Vacuum Off
Before doing any cleaning, turn the robot vacuum off and remove it from its charging dock. This is commonly recommended as a basic safety step to avoid the vacuum starting unexpectedly while you’re working on it, especially if it has a cleaning schedule set.
Step 2: Remove the Brush or Brush Cover If Your Model Allows It
Many robot vacuums allow the main brush, side brushes, or a brush cover to be removed for easier cleaning. The exact method differs by model, some use a latch or release tab, others use small screws, and others use a cover that lifts or slides off. If you’re not sure how your model’s brush comes apart, your manual is the safest way to confirm before you try.
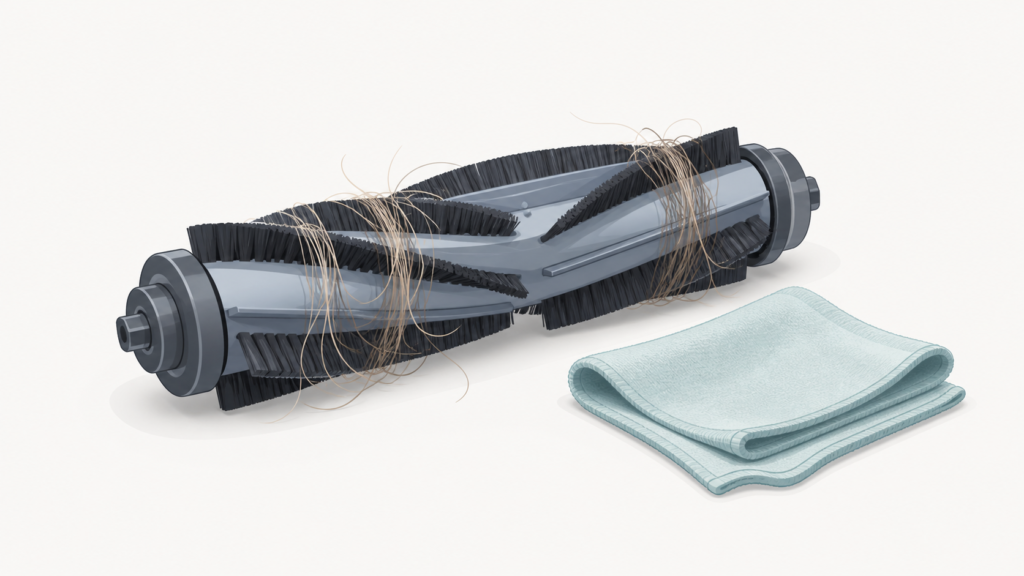
Step 3: Remove Hair, Fibers, and Debris
Once the brush is accessible, gently pull away any wrapped hair, fibers, or other debris by hand, working slowly so you don’t pull or bend the bristles. Debris often collects most heavily near the ends of the brush, so it’s worth checking there even if the middle looks clean.
Step 4: Wipe the Brush Area Carefully
After removing debris, you can wipe the brush and the surrounding area with a dry or barely damp cloth to clear remaining dust. Avoid letting water reach the motor or any electrical connection points near the brush, since several manufacturer guidelines caution against water exposure for motors, sensors, and charging contacts specifically.
Step 5: Reinstall the Brush Correctly
Once the brush and surrounding area are clean and dry, reinstall the brush following the reverse of however it was removed. Many models confirm correct reinstallation with a click, a snap, or the brush spinning freely without resistance. If a brush doesn’t sit back in place easily, double-check the alignment rather than forcing it.
Can You Wash Robot Vacuum Brushes with Water?
This is one of the most common questions beginners have, and the honest answer is: it depends on your specific model, so this isn’t something to assume either way.
At least one major manufacturer’s official guidance states that, for its product line, the main brush can be rinsed under water, but only if it is dried completely before being reinstalled. This kind of permission is brand-specific. It should not be assumed to apply to other brands, other models, or to side brushes in general, since other manufacturers’ documentation reviewed for this guide did not confirm the same allowance for their own brush assemblies.
Separately, general manufacturer guidance commonly warns against letting water reach brush motors, circuit boards, sensors, batteries, or charging contacts, recommending a dry or barely damp cloth for those components instead. Even on a model where the brush itself can be rinsed, the motor and electrical connection points are typically a different story.
Because the rules genuinely differ by brand and model, the safest approach is simple: check your model’s manual before using any water on its brushes, and when in doubt, stick to dry or barely damp cleaning instead.
How Often Should You Clean Robot Vacuum Brushes?
There’s no single cleaning frequency that applies to every robot vacuum, since it depends on the model, how often it runs, and your home environment. That said, some manufacturers suggest roughly weekly checks as a reasonable starting point for noticing tangles or debris before they build up.
Homes with pets, long hair, rugs, or higher dust levels may need more frequent brush checks than homes without those factors. Rather than following a fixed schedule, it can be more useful to check in periodically and adjust based on what you actually see building up on your brushes.
When Should Brushes Be Replaced?
Brushes are generally treated as replaceable, consumable parts rather than permanent fixtures, and replacement timing varies by model, usage, and manufacturer guidance.
As one example, at least one manufacturer suggests replacing its edge brush roughly every three months, or as needed. Other manufacturers reference a broader range, suggesting replacement somewhere around every three to six months depending on how often the vacuum is used. These figures are brand-specific examples rather than a universal rule that applies to every robot vacuum on the market.
Beyond following a general timeframe, it’s also worth watching for visual signs that a brush may need replacing rather than just cleaning: bent or frayed bristles, visible wear, or a brush that no longer spins freely even after a thorough cleaning.
Mistakes Beginners Should Avoid
- Assuming all brushes are water-safe. As covered above, water-rinse permissions are brand-specific, check your manual before assuming a brush can be rinsed.
- Skipping the manual entirely. Brush removal mechanisms and care instructions vary enough between models that guessing can lead to a brush that’s harder to reinstall, or unintentional damage.
- Assuming one universal cleaning or replacement schedule. “Clean weekly” or “replace every three months” are useful examples from specific manufacturers, not fixed rules for every device.
- Going beyond basic maintenance. Removing a brush to clear debris is standard consumer-level maintenance; taking apart the motor, sensors, or internal electronics is not, and isn’t necessary for routine brush care.
Maintenance Tips for Homes with Pets or Long Hair
Pet hair and long human hair tend to wrap around spinning brushes more readily than shorter fibers or dust, so homes with pets or longer hair may benefit from checking brushes more often than the general suggestions above. Some manufacturer guidance specifically notes more frequent checks, for example, roughly twice a week instead of once, for households with pets.
If you notice your vacuum’s brushes need attention more often than expected, that’s a normal reflection of your home’s conditions rather than a problem with the vacuum itself.
Frequently Asked Questions
Can I wash robot vacuum brushes with water?
It depends on your model. At least one manufacturer allows rinsing its main brush, provided it’s fully dried before reinstalling, but this isn’t confirmed for all brands or for side brushes. Avoid letting water reach motors, sensors, or charging contacts, and check your manual before using water on any brush.
How often should I clean robot vacuum brushes?
Many manufacturers suggest roughly weekly checks as a general guideline, but the right frequency depends on your model, usage, and home conditions such as pets or rugs. There isn’t one fixed schedule that applies to every robot vacuum.
When should I replace a robot vacuum brush?
Replacement timing varies by brand, with some manufacturers suggesting examples in the range of roughly three to six months depending on usage. Visible wear, fraying, or a brush that no longer spins freely are also useful signs that replacement may be due.
Why does hair get wrapped around robot vacuum brushes?
Spinning brushes are designed to sweep debris off the floor, and in the process, longer hair and fibers can wrap around the bristles instead of being collected directly. This is a normal byproduct of how these brushes work, not a defect.
Are main brushes and side brushes cleaned the same way?
Not exactly. They’re different components with different designs, so they often need different cleaning approaches. The general principles, removing debris, avoiding excess water near electrical parts, and reinstalling carefully, apply to both, but the specific steps for each should be confirmed in your model’s manual.
Final Takeaway
Cleaning a robot vacuum’s brushes is a normal, expected part of ownership, not a sign that anything is wrong. The main brush and side brushes serve different roles and may need slightly different care, but the general approach, turning the vacuum off, removing debris carefully, being cautious with water near electrical parts, and reinstalling correctly, applies across most models.
Because exact mechanisms, water tolerance, and recommended timing vary by brand and model, your device’s manual remains the most reliable place to confirm the specifics for your particular robot vacuum. If you’re still in the early stages of deciding what to buy, our robot vacuum buying guide for beginners covers this kind of ongoing maintenance alongside other beginner-friendly considerations.